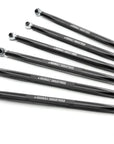
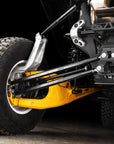
Assault Industries Can-Am Maverick R Turret Style Quick Camber Radius Rods
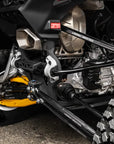
Turret-Style Radius Rods for the Can-Am Maverick R
Upgrade your Maverick R’s style with Assault Industries' badass Can-Am Maverick R Turret Style Quick Camber Radius Rods. They’re super strong and good looking. It’s easy to change your camber fast thanks to Assault Industries' quick-camber design.
Durable and Lightweight Thanks to Aluminum
These radius rods are built with durable anodized aluminum. It’s strong and lightweight. With these radius rods for the Maverick R, you don’t have to sacrifice quality for good looks.
Adjust Camber with Ease
Assault Industries made these radius rods easy to adjust. The upper rods feature a quick-camber function, making it simple to keep perfect camber.
Upgrade your Maverick R’s style with Assault Industries' badass Can-Am Maverick R Turret Style Quick Camber Radius Rods. They’re super strong and good looking. It’s easy to change your camber fast thanks to Assault Industries' quick-camber design.
- Made with durable 7075-T6 aluminum alloy
- 3.3 mm larger diameter than OEM radius rods
- Glossy anodized black coating with etched Assault Industries logos
Durable and Lightweight Thanks to Aluminum
These radius rods are built with durable anodized aluminum. It’s strong and lightweight. With these radius rods for the Maverick R, you don’t have to sacrifice quality for good looks.
Adjust Camber with Ease
Assault Industries made these radius rods easy to adjust. The upper rods feature a quick-camber function, making it simple to keep perfect camber.
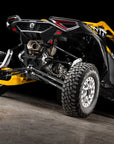
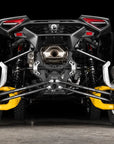
Anodized to Resist Corrosion
The glossy black anodized finish offers incredible protection and style. It shields the radius rods from rust and corrosion—and it looks sleek on the back of your Can-Am Maverick R.
- Superior strength and rigidity to OEM rods
- Direct bolt-on replacement
- Hexagonal turret design
- Heavy-duty adjustable 3/4” heims
- High-grade machined billet aluminum
- Hard anodized finish
WARNING: This product can impact machine operation. Customer and/or user is responsible for ensuring that this product is compatible with their machine as currently configured, properly installed, and understands any impact this product has or might have on the machine's operation.
⚠ California Proposition 65 Warning ⚠
WARNING: This product may contain a chemical known to the State of California to cause cancer or birth defects or other reproductive harm.